


Setting up QuickBooks, the popular accounting software, is a pivotal step towards simplifying your financial management. This comprehensive step-by-step guide walks you through the essential process of everything you need to start using QuickBooks. QuickBooks offers a robust platform for your business to manage its finances efficiently.
From tracking expenses and income to generating detailed financial reports, it’s a versatile tool. This article covers the fundamental steps: creating your company file, customizing settings, adding accounts, and connecting your bank accounts. Whether you’re a small business owner or a financial professional, mastering QuickBooks helps you maintain accurate records and make informed financial decisions.
How to Set Up QuickBooks
1. Understand What QuickBooks Is and How it Works.
2. Purchase QuickBooks Software or Subscribe to QuickBooks Online.
3. Create a QuickBooks Account.
4. Create Your Company Profile.
5. Add Your Business Bank Account.
6. Include Your Business Income and Expenses.
7. Customize Your Chart of Accounts.
8. Import or Enter Your Transactions.
9. Generate Financial Reports.
10. File Taxes Using QuickBooks if Needed.
Excited, right? Keep reading!
1. Understand What QuickBooks Is and How it Works
To set up QuickBooks, understand what the software is and how it works. QuickBooks is accounting software that helps your business to manage its financial data efficiently. It assists you in tracking your income, expenses, and other financial transactions. You can create and customize invoices, manage payroll, reconcile bank accounts, and generate financial reports.
QuickBooks simplifies bookkeeping by automating many tasks, reducing errors, and providing a clear financial overview. It operates on a double-entry accounting system where it ensures accuracy in financial records. You can access QuickBooks via desktop software or through a cloud-based version, QuickBooks Online—making it accessible from anywhere with an internet connection.
2. Purchase QuickBooks Software or Subscribe to QuickBooks Online
To set up QuickBooks, the first step is to either purchase the QuickBooks software or subscribe to QuickBooks Online. Purchasing the software entails buying a physical copy or downloading the application, usually for a one-time fee. In contrast, QuickBooks Online is a cloud-based service that you access through a subscription.
With QuickBooks Online, you don’t need to install software; you can log in from any device with an internet connection, ensuring accessibility and automatic updates. The choice between the two depends on your preference, budget, and the need for remote access. After this initial step, you proceed to configure your company profile and start inputting financial data.
>>> PRO TIPS: Netsuite Accounting Software Review
3. Create a QuickBooks Account
To create a QuickBooks account, visit the software’s website and click on the “Register for free” button. You need to provide essential details about your business, such as its name, type, and industry. Next, input your personal information as the account administrator. Afterward, choose the appropriate QuickBooks plan (Online or Desktop) and any add-ons you require.
Set up your account security by creating a strong password and answering security questions. Review your information, agree to the terms of service, and complete the registration process. QuickBooks then guides you through further steps to configure your company profile and financial settings.
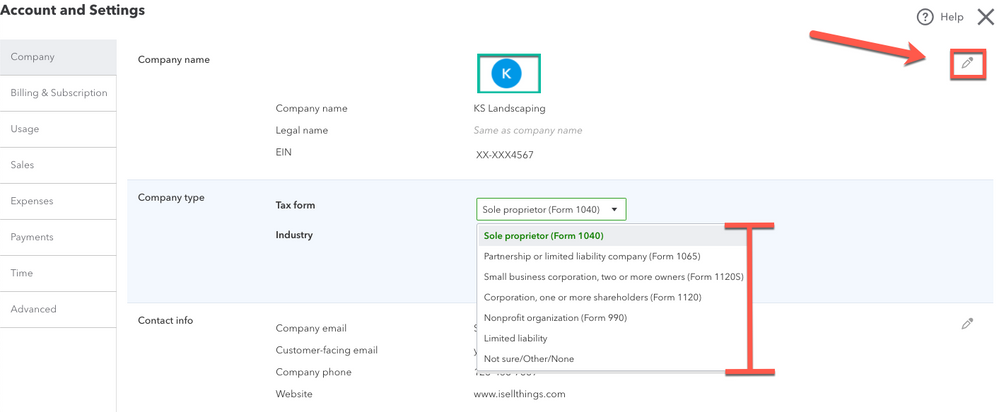
4. Create Your Company Profile
To set up QuickBooks, create your company profile. This stage involves inputting essential business information such as your company name, address, contact details, and tax identification number. Note that the data you provide forms the foundation of your accounting system, ensuring that you accurately attribute transactions and reports to your business.
Additionally, specify your business type, industry, and fiscal year start date so as to tailor QuickBooks to your specific needs. Accurate profile set up eases financial tasks, like invoicing and tax reporting, and helps you get the most out of QuickBooks by aligning its features with your company’s unique requirements.
5. Add Your Business Bank Account
To set up QuickBooks, add your business bank account information. To complete this step, navigate to the “Chart of Accounts” section in QuickBooks settings. Click on “New” and choose “Bank” as the account type. Enter your bank’s name and account details, including the account number and starting balance.
QuickBooks then connects to your bank electronically, enabling automatic transaction downloads, simplifying reconciliation, and keeping your financial records up to date. This feature allows you to track income and expenses seamlessly, providing a clear overview of your financial health and streamlining tasks like expense categorization and reconciliation.
6. Include Your Business Income and Expenses
To include your business income and expenses when setting up QuickBooks, you input all financial transactions relevant to your company’s operations. This encompasses revenue sources like sales and payments from clients, as well as expenses such as rent, utilities, and office supplies. QuickBooks provides tools that allow you to record transactions, including invoicing for income and entering bills for expenses.
You categorize each entry to align with your chart of accounts, ensuring accurate financial reporting. Regularly updating this information allows QuickBooks to generate crucial financial statements like profit and loss reports, helping you monitor your business’s financial health and make informed decisions.
7. Customize Your Chart of Accounts
To fully set up QuickBooks, customize your chart of accounts. This step involves creating and organizing categories for all financial transactions. You can add, edit, or delete accounts to reflect your company’s structure accurately.
Thanks to this customization, you can precisely track income, expenses, and assets. For instance, you can set up separate accounts for different revenue sources, expense types, or departments. By customizing your chart of accounts, you gain a clear view of your financial health, making it easier to generate accurate reports and make informed financial decisions.
>>> GET SMARTER: How to Choose Invoicing Software
8. Import or Enter Your Transactions
To adequately set up QuickBooks, import or Enter your transactions. You can manually input each transaction, like invoices, bills, or expenses, which provides precise control over data. Alternatively, QuickBooks allows importing transactions from bank and credit card statements, saving time and reducing errors.
Once you link your accounts, the software automatically downloads transactions, ready for categorization. This process ensures accuracy in your financial records. You can then match the transactions you import with existing records to ensure consistency. Overall, this feature eases data entry, simplifies reconciliation, and helps maintain an up-to-date financial picture of your business.
9. Generate Financial Reports
To set up QuickBooks, generate financial reports. This is where you use the software to compile and present essential financial data in a structured format. QuickBooks offers a range of pre-made reports such as profit and loss statements, balance sheets, cash flow statements, and more.
You can customize these reports to suit your specific needs by selecting date ranges, accounts, and other parameters. These reports provide valuable insights into the financial health of your business, aiding in decision-making, tax preparation, and financial analysis. Generating accurate and timely reports is essential for monitoring, managing, and growing a business effectively.
10. File Taxes Using QuickBooks if Needed
To set up QuickBooks, file taxes with it if you need to. QuickBooks collects and organizes your financial data throughout the year, making it easier to calculate tax liabilities accurately. It offers features like tax categorization, deductions tracking, and report generation specific to tax requirements.
Depending on your business structure and location, QuickBooks can also help you generate tax forms, such as W-2s and 1099s. Some versions of QuickBooks integrate with tax preparation software, simplifying the process further. This feature ensures compliance with tax regulations and facilitates a smoother tax-filing process for your business.
Pro Tips in Setting Up QuickBooks
Recap
Setting up QuickBooks involves a series of steps to streamline your monetary management. Begin by grasping what QuickBooks is and how it functions to harness its capabilities effectively. Then, either purchase QuickBooks software or subscribe to QuickBooks Online based on your preference. Create your QuickBooks account and establish your company profile, ensuring accurate business representation.
Add your business bank account, along with income and expense details. Customize your chart of accounts to align with your financial structure. Import or manually enter transactions for comprehensive record-keeping. Utilize QuickBooks to generate vital financial reports, aiding informed decision-making. Lastly, if necessary, leverage QuickBooks to simplify the tax-filing process.